Making Proxy communicate with Cisco routers and accept WCCP intercepted HTTP traffic from them.
Cisco ASA
Bypass the proxy box from re-capture
access-list wccp_redirect extended deny ip host ARTICA_IP any
Note: This shouldn’t be required, because the asa would build this rule itself, when adding the proxy box.
… while capturing the local /24 network defined by “workstations”.
access-list wccp_redirect extended permit tcp workstations 255.255.255.0 any eq www
Intercept everything not prevented by the bypass list:
wccp web-cache redirect-list wccp_redirect password foo
wccp interface internal web-cache redirect in
87x CISCO type
( special thanks for Stephane NAYAGOM for these rules)
access-list 10 permit ARTICA_IP
ip wccp web-cache group-list 10
access-list 120 remark ACL for WCCP proxy access
access-list 120 remark Squid proxies bypass WCCP
access-list 120 deny ip host ARTICA_IP any
access-list 120 remark LAN clients proxy port 80 only
access-list 120 permit tcp 10.254.253.0 0.0.0.255 any eq 80 (filtered network)
access-list 120 permit tcp 192.168.10.0 0.0.0.255 any eq 80 (filtered network)
access-list 120 remark all others bypass WCCP
access-list 120 deny ip any any
ip wccp web-cache redirect-list 120
ip wccp version 2
interface vlan 1 (Filtered Network Interface)
ip wccp web-cache redirect in
Artica
- You must use Artica version 2.09.061800 or later.
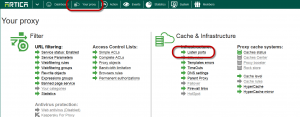
- On the top menu, choose “Your Proxy“
- Select “Listen ports” item.
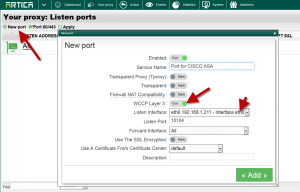
- Click on “New port“
- Enable the WCCP Layer 3 option.
- Select the main network interface that will handle the GRE tunnel.
- Click on Add.
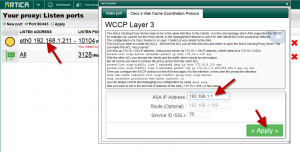
- Select your new port on the main table.
- Choose the Cisco’s Web Cache Coordination Protocol tab
- Set your router ASA IP address
- If you need to use a specific gateway to access to the ASA, define the gateway in the route field.
- The service ID is used if you need to transfer SSL to the proxy. (we assume that the SSL is enabled in the main port settings)
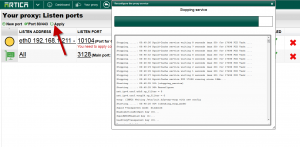
- Click on Apply to make the port available
- The icon on the table must be green


